We all have some secrets that we don't prefer to share even with our besties, And if you're a guy then you might be having some folders kept hidden and blended between some other folders to keep it invisible from anyone else using your computer.
Even though protecting important secret files in folders with passwords is necessary, but sometimes you may be forced to reveal your passwords to unlock secret folders to protect your valuable relationship from breaking. So here we come with a new technique that will keep your secrets as secret without let anyone know that you too have secrets, sounds good isn't it.
Don't Just Protect Disk Drives with Passwords Better Hide From Others
Stopping anyone from accessing your secret files with passwords is good. However, they know that you have secrets and they might attempt to crack your password in your absence with the traces left around. So don't give anyone the chance to peep into your secrets.
Also Read: How to Format Write Protected USB Disk Drive and SD Card
In windows hiding a disk drive on any user account can be done in several ways, but here we will share the easiest way among them.
- Way 1: Hide Disk Drive Using Command Prompt
- Way 2: To Hide Windows Disk Drives Using Disk Management Console(Recommended)
1: Hide Drive from Windows Explorer using Command Prompt
Third-party tools are used by Windows users to accomplish a certain task which is complex using command prompt, despite the facilitation of third-party tools in complex windows events, it has a higher risk of security threat. So it is better to type a few commands by referring the below procedure to stay safe and secure.
Third-party tools are used by Windows users to accomplish a certain task which is complex using command prompt, despite the facilitation of third-party tools in complex windows events, it has a higher risk of security threat. So it is better to type a few commands by referring the below procedure to stay safe and secure.
- Step: Open the "command prompt" window by typing CMD in Start menu search field of windows and tap on "Enter Key".
- Step: In the command prompt window type Diskpart and tap enter key. Immediately a User Account Control(UAC) window prompts, Click yes to continue with the process.

Windows Command Prompt - Disk Part - User Account Control - Step: After clicking on yes another new window prompts to proceed with the further process. In the new window type "list volume" and hit enter to list all the drives partition connected with the system(includes External & Internal drives).

List of all disk drives connected to the system - Step: Once the drives are listed, select any drive that you want to hide from windows explorer. To select a drive Just type "Select Volume E" (replace E with the drive letter (or) drive volume of the disk you want to hide) and hit enter. For Example Select Volume 3(Here 3 denote the volume number)

Select the drive that you want to hide from explorer - Step: After the drive is selected, Just type "remove letter E" and tap on Enter key(here E denotes the drive letter which has to be hidden from the windows my computer list)

Windows drive successfully removed from explorer - Step: And you've successfully removed a drive from the windows explorer, now close the command prompt window and you will not see your disk drive E listed in windows explorer.
To display the removed drive back in windows explorer?
By following the above procedure we have successfully hidden the drive from explorer if you feel the wrong drive has been removed from the explorer (or) want to show it back again on my computer, just follow the below steps.
Note: Since the drive letter assigned to the drive has been removed, only the volume number can be used to select the drive.
- Just redo the above procedures from step 1 to step 4 (procedures explained below in SHORT for quick remembrance)
- Open cmd prompt window, type Diskpart, and click enter.
- click yes to continue in UAC(User access control).
- In the new window type, list volume to list all drives.
- Type select volume 3(replace 3 with the drive volume to show the hidden drive)
- Once the hidden drive is selected, type Assign letter E(replace the drive letter with the drive letter you want to unhide) and then tap on "Enter key" to see the hidden drive back in explorer.
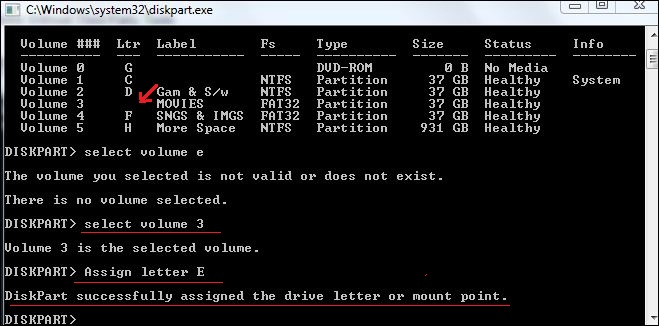
Assign the drive letter to the drive to make it visible again in Explorer - And you're done, the drive that you have deliberately hidden from windows explorer is now visible to everyone.
2: Hide Windows Disk Drive Volumes Using Disk Management
You don't need to be a techie to enable and disable disk drives from windows my computer using windows "Disk Management". Just follow the below steps.
You don't need to be a techie to enable and disable disk drives from windows my computer using windows "Disk Management". Just follow the below steps.
- Step 1: Open disk Management console window by typing "diskmgmt.msc" in start menu search field of windows (or) in the run window then tap on "Enter Key" to open the console to load the disk management configuration information.

Type the command in start search or RUN then tap on "Enter" - Step 2: Here all drives attached to the computer will be loaded and listed here.
- Step 3: Target the mouse pointer on any drive that you want to hide from windows explorer then right-click on it and select "Change drive letter and Path".

Right-click on any drive and select change drive letter and paths - Step 4: Immediately another new window prompts, here click remove to clear the drive letter assigned to the volume.

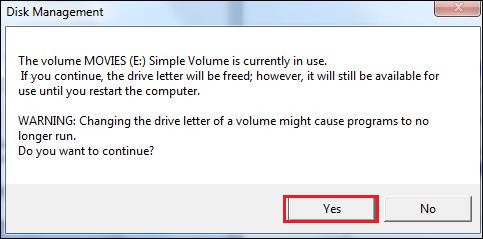
remove the selected drive and click on OK - Step 5: After clicking on "OK" in change drive letter path, a warning message appears as below to confirm the action, Just click "Yes" on both the warning message prompts to complete the process.

Warning message prompts to confirm the action to hide drive
- Step 6: And you're done, the drive that you have selected has been successfully hidden from the windows explorer.
To show the hidden drive back in windows explorer just repeat the above step from step 1 to step 3 and in step 4 instead of selecting remove option just click on Add option and Assign any drive letter to the hidden drive to get listed in the windows explorer.
Comments
Post a Comment